Showing posts with label hair. Show all posts

Wednesday, January 28, 2015

Having a Fringe: Tips and Tricks


I've had a straight cut fringe, or 'bangs', for the most part of my life. I'd consider it my signature style and I feel completely odd on occasions when it must be pinned back or has temporarily grown out. Though I'm not at all in any way, shape or form a hair expert I thought I'd share with you all some of the tips and tricks I've picked up over the years in regards to maintaining a fringe. Some of these may be completely obvious to those of you that too have a fringe but if you are new to them, or thinking about getting one, I hope you find something helpful!


Terry Cloth Bands

I find these to be an utmost necessity for having a fringe. I'm sure all of you who have one have experienced an occasion in which you are trying to wash your face, shower, moisturize or apply your makeup and your fringe just completely gets in the way to suffer the wrath of hot water and oily products. Alice bands can work but if your fringe if quite short tendrils of hair can fall out and prove to be disruptive. I find terry cloth bands work well as they are wide, ensuring greater security, and the material is perfect for absorbing chance splashes of water. I myself use an elasticized cloth band over one with velcro for maximum security of my fringe and the fact that the velcro ones can often cause discomfort by clinging to stray hairs. 

Dry Shampoo

Let's face it. Sometimes we are just in too much of a rush to wash our hair and I would never recommend washing your fringe on its own! Dry shampoo is a life saver for hair, especially fringes. Give a quick spritz, fluff up your hair and then brush it out. Voila! I find that a soft bristled brush works best for this. I always keep a can of dry shampoo on my bathroom shelf and take it with me when travelling. Some brands are even available in handy travel sized cans. I find it particularly handy for hot and humid summer days. 

Rest

Some days I think it is good to just give your fringe a bit of a break, especially during hot weather. Oils from your forehead can make your fringe quite oily and it's not the best look or feeling. It will also give your forehead a break, espcially if you have problem skin. Alice bands are perfect for this and many cute 'dos can be styled around them. I find that toothed bands work best, with better grip to prevent stray hairs from falling loose. Bobby pins can also work for longer fringes. 


Flathead Hairdryer Attachment

On days when my hair is not as tame as I'd like it to be after a wash, when damp and combed, I like to give my fringe a blast with my hairdryer's 'flat head' attachment. This attachment concentrates the airflow onto a specific area of your hair, enabling a greater amount of control when styling. I blast it directly down from the root the to ends on a warm setting with medium strength, straightening the hair out into place and creating a nice shine. I then go over it with a quick cool setting to set it and then let the rest of my hair dry naturally. This method can also be helpful to tame some cow's licks. 

Rolling

A good trick to do when your fringe is getting just that little bit longer in between trims is to roll it. This is done when styling your hair for a day or night out. Soft bristled roller brushes work best for this. On dry hair, lift the brush up under your fringe to the root and roll it away from you through the hair. While doing this, blast your hair with a hairdryer on a warm setting with medium strength. Gently brush it out. The results should be a nice and bouncy, slightly shorter fringe.

Trimming

I have been trimming my own fringe for years now. Some people are against the idea of trimming your own fringe as if it were taboo but I say do what you feel comfortable with. If you are happy to get it done on a regular basis at a salon, fabulous! But know that you can do it on your own at home with the right equipment and by adhering to certain instructions, saving time and money. Let me say, never, never use nail or safety scissors when cutting your own hair. Always use a pair of hair cutting shears. These can be bought from various salons or beauty stores. A good tutorial you can watch to learn how to trim your fringe properly can be found here.  


Do you have any of your own tips or tricks when it comes to fringes?
I'd love to hear of them!

Sunday, March 23, 2014

Flipping For New Hair


And so here is my new hair!

(I'm not very adventureous, I am?)

A few weeks ago I decided that I wanted to get my hair done. Not just cut. Done, which is something extremely rare for me. Growing up in school I was known for never wearing a different hairstyle, and was sometimes teased for it. I've never frequented hair dressers, having only been to them a couple of times within my life to be honest. I've always had family to cut my hair for me, and myself to look after my fringe. But something got me pining for a change not too long ago. I began dreaming of gorgeous 1960's flip styles. I have always wanted to get one professionally done for years, but I never got to it. Things had been quite stressful at the time so I decide to treat myself and just do it.

These were the ladies who were my main 'flipspiration' at the time. I had recently watched Tim Burton's film "Dark Shadows" (2012) and was swooning over the hair of the character Victoria Winters, and her fabulous set of costumes mind you. This was the change I wanted. Add Jean Shrimpton's volume and Cynthia Lennon's sheen and bounce, and there is a dream hairstyle of mine! I was very happy with how the style turned out. I felt pretty fab! But I feel so silly now as I didn't think to take any pictures of it! The style lasted for about 3-4 days, loosing it's shape a little bit each day. It was fun while it lasted though!


I am currently on the look out for some new rollers and pins so I can replicate the style myself at home. The hair dresser was very lovely and gave me tips throughout the whole appointment on how to do it on my own. She also cut it in a way that the ends would flip up a little on their own without any styling which was very nice. Anyway, here is the outfit that I wore the other night out to the movies. My new hair made me feel like I'd just stepped out of 1964 from a Beatles concert.


What sort of things do you like to do when you feel like a change?

1 / 2 / 3

Thursday, December 19, 2013

Five Minute Pattie Boyd Hair Tutorial


Not long ago one of my Tumblr followers asked me if I could do a tutorial on one of the hairstyles Pattie Boyd was seen wearing in the 1960's. And I thought I'd give it a shot. Unfortunately my hair is too long to replicate this gorgeous 'do, so my completed hairstyle is merely an adaptation, more reminiscent of Miss Boyd's barnet on her wedding day to Beatle George Harrison in 1966. But if you have hair at a similar length to Pattie's in this adorable 1964 picture of her, the look should be spot on if you follow my seven simple steps. And it only takes five minutes!


YOU WILL NEED:

- A good brush
- A 'rat tail' teasing comb
- A black hair-tie
- Thick black ribbon

Note: This style works best one to two days after washing your hair.
For medium to thick hair. 

STEP ONE:

Tame your hair by giving it a good brush. 

STEP TWO:

Brush hair (excluding your fringe/bangs) away from your face and towards the back of the head. 

STEP THREE:

Run your two thumbs from just above your ears to the upper back of your head, separating your hair into two groups. Make sure it is quite smooth with your brush!

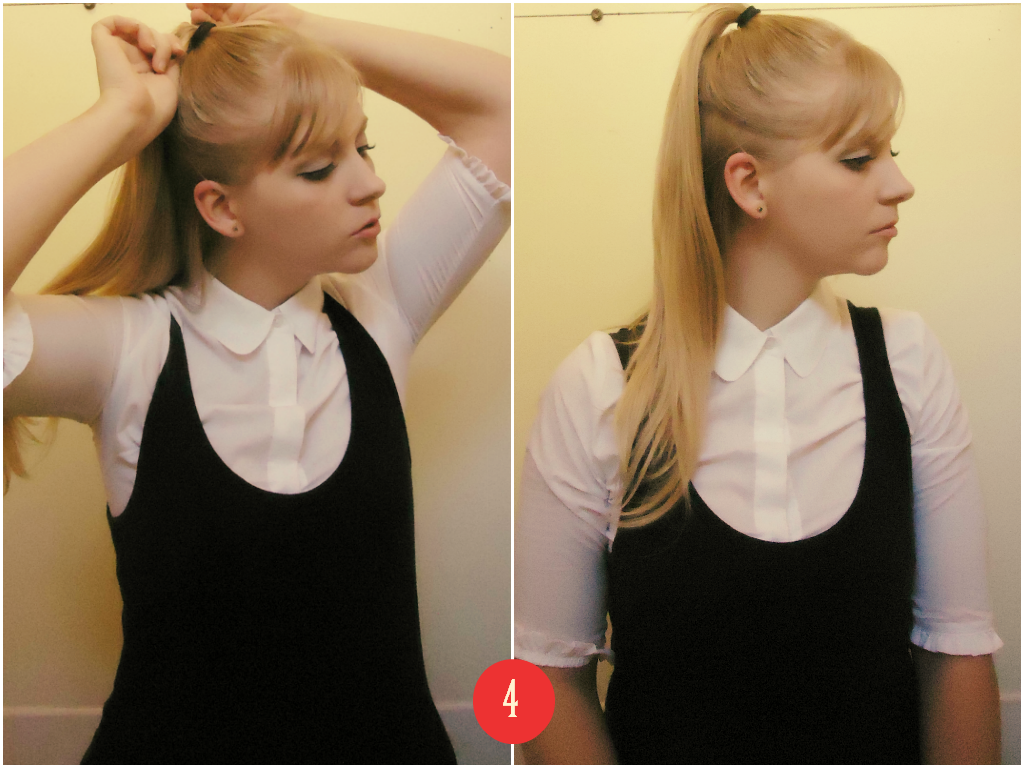
STEP FOUR:

Pull it right up into a smooth high ponytail, right on top of your head.
Secure with black hair tie.

STEP FIVE:

Gently pull at the side of the ponytail and fan your hair out to come down around the sides of your face.

STEP SIX:

Slide the teasing comb into the top part of your hair above the fringe and gently push forward to create a buffy look. You could call this a cheat's way at getting your hair to look a little teased when you are in a rush or on the go. Make sure it is quite even all around.

STEP SEVEN:

Tie in a thick black ribbon, brush your hair and fringe so it falls nicely, spritz a little hair spray and ta-da!

If you like, and if you aren't in a rush, you can always also curl your hair at the ends for a sweeter look. You can also improvise and swap the ribbon with a cute hair clip, or even wrap an extra bit of hair around the hair-tie like Cynthia Lennon, who was also seen wearing a similar hairstyle in the 1960's. Give it a whirl.

Let me know if you need further clarification. I hope you enjoyed!

1 / 2

Friday, June 21, 2013

Curls from Cooly Rocks On

At last her is a picture of my curls from the "Cooly Rocks On" festival, as mentioned here, before they were destroyed by the menaces of the wind and rain. It was only a quick shot before we left the house as we were running quite late (hence the seriousness of my expression). Though now I do wish that I'd gotten a picture of the back of my hair as well, as I thought the curls at the back looked much lovelier and fluffier. But oh well.

I was also very pleased with my makeup that day, and I think it was one of the best jobs I'd done of it in a long while. This picture really does it no justice.


Every time I see my red walls in photos I grow on them just a little more.
I think I'm turning into a lover a red, something I never really was.

Friday, June 7, 2013

Pinup Pin Curls

Yes, I have taken a step back in time from my usual 1960's dolly gear, but as mentioned here, our local area's annual 1950's nostalgia festival, "Cooly Rocks On", is here again and it is one of my favourite times of the year.

For the festival I do my very best to achieve an authentic 1950's vintage look. I spend days, weeks and even months in preparation for it. I've been growing out my beloved fringe specifically for it. Another one of these preparations that I do is to determine how I will style my hair. Last year I wore victory rolls, but this year I am going for Pin Curls!


Yesterday I gave them a test run. It was a lot more difficult to do this time. I haven't done them for over a year and the lady who cut my hair at the hairdresser's put layers in the front of my hair without my consent (not happy!). But thankfully they turned out the best that they ever have for me! Both the boy and myself took pictures of me in front of my dressing table and in my vintage dressing gown. I felt like a movie star! 
I also tried something different this time and clipped a flower into my hair, something I've never done before. I was so pleased with it that this is how I am going to wear my hair tomorrow!


I am also loving this lip colour! I've never worn anything this dark before but decided to give it a shot as I have had this lipstick for years and recently bought a new lip liner that matched it's colour.

Yes, I am happy with the way that they turned out. But I wasn't happy that I didn't get to keep them in for long. I took the pins out at 1:00 in the morning as the boy and I had been out with friends having dinner at a chocolate restaurant. I had put them in as a test run and had planned to take them out much earlier so I could enjoy them and style them for longer. So now I have my hair in Pin Curls yet again, and this time I am going to sleep on them. I am hoping very much that they turn out like these here! 

In the next very days I am hoping to post pictures from the event and of my 1950's festival outfits.

Saturday, April 20, 2013

Dynel Dolly

I thought that I might just make a quick post of a few pictures from the 1967 photo shoot of the lovely Twiggy wearing a long Dynel hair piece as she poses in a variety of cute hand knitted outfits.

In the later 1960's in order to assist in gaining height in beehive and bouffant hairstyles, many women wore Dynel hairpieces. Dynel was a synthetic hair that was originally used for Barbie Dolls. The product could be bought from large department stores and there it would be dyed to accurately match the buyer's hair colour. It would then be pinned to the woman's head in a way that it would appear as natural hair. It could be disguised by braiding it, hiding the pins with strands of natural hair wrapped around them, or by using a pretty head band or ribbon, as Twiggy has done so for this photo shoot. 


Dynel was also used to make faux fur in the 1960's.  It can be seen used in many vintage coats and handbags.

Sunday, April 14, 2013

New 'Do

Outfit:

- New 'do
- Black singlet top
- Red 60's inspired mod skirt
- Black tights (that have been in the presence of Ringo Starr might I add)
- Black block-heeled Mary-Janes
- Vintage white purse


Though this may sound quite unbelievable, today I got my first ever professional haircut. 

All my life I have had my hair cut by family members, or have merely just cut it myself. I achieved this through a process of scrupulously studying the fringes of Marianne Faithfull, Pattie Boyd (and Brian Jones) and copying them to the best of my ability. So, this was a big thing for me! For the past year I have let my hair grow, and grow, and grow. Including my beloved fringe, until I no longer had one! At last I decided it was time to get the old 60's 'do back again. So. In I took my picture of Marianne and the lovely lady did her best to replicate it.


Please do excuse the dreadful quality of my picture. You see, in the past year I have also bought my first laptop, which I have christened Lovely Rita. We seem to get along alright, but the inbuilt camera isn't too keen to become too well acquainted with me yet.

Also today, on my way to the hairdressers, by chance I came across a Car Boot Sale. Fantastic! Looking rather out of place on one of the clothing racks was a big, black, beautiful 50's style petticoat. I have been looking for one that I can afford to buy for a very long time to wear under my 50's style dresses. I cautiously asked the woman at the stall how much it was. $2.00. Lucky me.
Moving on I found one of the most beautiful pairs of shoes that I have ever seen. Bright red, original 60's mod style and with a big gold buckle on them, I had to have them. But alas they were the tiniest bit to tight for my tootsies. You can imagine how disappointed I was. Though the owner found out that I collected 1960's vintage she was kind enough to let me have them for free to add to my collection. 

What do you think? Should I sell them?
(Don't mind the price stickers. I couldn't get them off.)

Monday, March 26, 2012

Styling Her Curls and Waves

On Tumblr I was asked about styles for wavy and/or curly hair in the sixties. Below are just some examples of the many ways that hair could be styled.

In the later sixites curled styles became much more popular for a variety of reasons. In 1968 "Romeo and Juliet" was released, popularizing a trend of romantic curls and Juliet sleeves within the fashion world. There was also the increased appreciation for the Art Nouveau period, which favoured natural and organic line and shape. Hairstyles would be influenced by this, and the short, sharp and geometric styles of the 'mod' sixties were on the way out. This could be clearly seen in new fashions like that of Barbara Hulanicki's Biba boutique, which also took inspiration from the styles and glamour of the 1940's. The ideals of the 'hippie' movement, favouring freedom and natural beauty, also assisted in the popularization of these styles. Rather than blow drying or ironing their hair straight, people now began to let their natural curls and waves loose and take advantage of them.

Barbara Hulanicki's Biba.


Pattie Boyd


Brigitte Bardot


Jean Shrimpton


Pamela Courson


Twiggy


Veruschka


Nancy Sinatra


Diana Ross


Lauren Hutton


Cathee Dahmen


Sharon Tate


Marisa Berenson


Jane Fonda


Linda Keith


Mary Hopkin


Grace Slick


(Images: 1. 2. 3. 4. 5. 6. 7. 8. 9. 10. 11. 12. 13. 14. 15. 16. 17. 18. 19. 20. 21. 22. 23. 24. 25. 26. 27. 28. 29. 30. 31. 32. 33. 34. 35. 36. 37. 38. 39. 40. 41. 42. 43. 44. 45. 46. )